This short video tutorial explains how to create quick, professional looking text sound effects using Photoshop. What’s more, the effect is non-destructive, meaning it uses layer styles on active text (not rasterized text) so you can change the word, change the look and even save it as a style to apply to other text. This is the way I do a majority of text effects on my comic Marooned.

I believe this technique should work with Photoshop CS2 or later. I’m not sure about earlier versions.
1) Create a text layer and type your text sound effect. Do NOT rasterize the text!
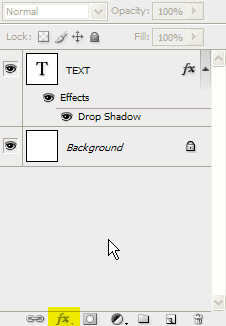
2) With the text layer selected, click the “fx” icon at the bottom of the layer palette. (see below)

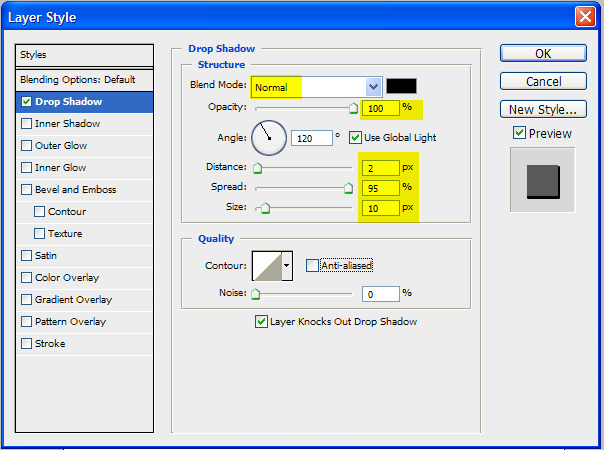
3) We’re going to use the drop shadow as an outline instead. In order to do this, set the blend mode to “normal” and the opacity to 100%. Then the key setting is to change the spread to 90-95%. This will “harden” the drop shadow and make it look like a border. From here you play with the distance and size to get the look you want. (see below)

4) At this point this might be all you need. Often I will use only white text with a black border using this technique and stop there. But you can do more to make it look spiffier. Go back into the layer effects and choose Gradient Overlay, and put an overlay over the text. You can also add a stroke, playing with the stroke position and color until you get something that you like.
5) You don’t want this text looking plain, though, so we’re going to Warp the text. Right click on the text layer and choose “warp text.” Under the “Style” pulldown, choose “arc,” and change the “bend” property to something that you like (either negative or positive). I generally choose something around 35% start. You can play with other warp styles, but arc tends to work the best.
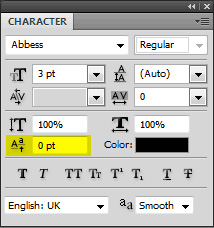
6) An optional step, but one that helps make things look a bit more dynamic is to adjust the baseline shift of a couple of letters. I often choose the second and second to last letters, or something like that. Simply select a letter, go to the Character palette and click and drag on the baseline shift icon (see below). A couple points in either direction should do it.

7) Lastly, you can hit CTRL-T (CMD-T on Mac) and transform your text, rotating it to fit the action in the panel.
That’s it! The effect you have now is completely editable because we’ve used non-destructive techniques. Change the word, the arc, anything you want. Save it as a style and apply it to text in other strips. Play with the settings to get the look you like, there’s no one right way to do it. Now go play with some text!
_________________
by Tom Dell’Aringa (Maroonedcomic.com)
makingcomics.com
Great tutorial. I lettered my book in Illustrator but am looking to switch to a hybrid of InDesign (for balloons, captions and prepress layout) and Photoshop for effects since Blending modes, opacity and layer FX are such a pain in Illustrator. Also masking out portions of text is incredibly difficult versus using a mask in Photoshop (linked to flats would make it really easy).
awesome tutorial, and cooooooooooooooooooooooooooooool it just awsome!
not only the background same impotency of the font. Font choosing are so gooooooooooood. thank you for shearing this tutorial.
download this and any font free please visit
Awesome Photoshop tuts to add comic style text effect.