If you use Adobe Photoshop at any point in your comics making process, then there’s a good chance you should be using Actions to speed up your process. But what are Actions, and why would you want to use them?

Let’s tackle the second part of that question first. By nature, comics making is quite repetitive. We find ourselves doing the same task over and over again. Setting text, converting files, speech bubbles, fills, selections, it goes on and on. All this takes time, and for those of us who make comics, time is one of our most precious commodities! Sure, you memorize your keyboard shortcuts and your processes and you think you’ve gotten pretty fast. But the truth is, if you aren’t using actions you are wasting your time.
Photoshop Actions allow you to record a set of steps – steps that can get very complex and layered – and play them back at the press of a button. Think of the most complex process you go through each time you make a comic – the digging through menus, setting values and finding keystrokes – and then imagine you could avoid all of that and just click a button. Well, with Actions, you can do that.
While it all sounds great in theory, let’s look at some concrete examples. First, let’s make sure your actions panel is showing by going into the menu and choosing Windows > Actions. If you’ve never used them before, your panel may look something like this:
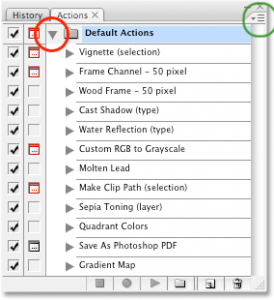
The arrow circled in red will expand the default set (or any set you save). If you click the icon circled in green on the upper right, you can choose “Button mode,” and the list will switch to clickable buttons. Once you have your actions set up, that is how you want to use them.
Automated tasks sound great, but how specifically might we use them? First, let’s take an extremely task intensive process – preparing a scan as lineart. I scan my artwork in at 600dpi in grayscale. From there, after stitching images together if necessary, I want to convert that scan into layers, one that has just the lineart in black, and one that has a white background. This allows me to put lots of other layers and leave the lineart intact – and also allows me to color the lineart with ease.
The process I use for this is taken nearly verbatim from Brad Guigar’s explanation in the book “How to Make Webcomics.” It is no less than 26 steps! Take a look at the action below to see them:
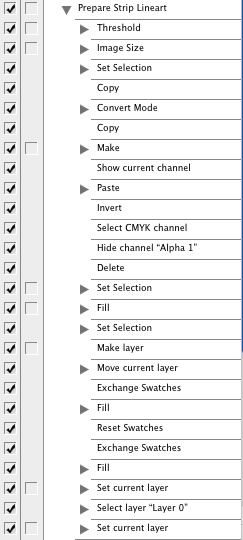
Do I want to run through 26 steps every time I make a comic – and worry about all the associated settings for some of them? I certainly do not. This is a perfect case for an action!
What other processes do I continually repeat? Well, about 100 or so times each comic, I select an area, expand it by 2 pixels (to “trap” the color so it essentially goes “under” the lineart and prints correctly) then hit alt-delete to fill the area, and deselect. After about the 20th time, I’m about ready for carpel tunnel surgery.
That’s another perfect item for an action. How about exporting my comic for web publication? That involves sampling and sizing down – that’s an action. Inverting a selection, which is a goofy keyboard shortcut – action. In a case very specific to my comic, I have a speech bubble for a character named “Voon” that uses a Filter to get a wavy balloon effect. There are no less than 8 specific parameters I would have to constantly remember (and I never did) to replicate the effect. That’s definitely an action! See below:
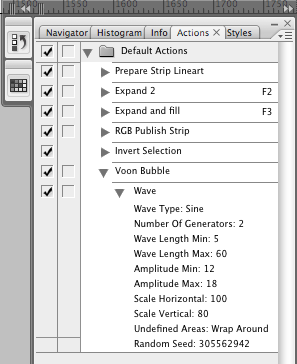
And I should mention a bonus feature of actions – namely you can map them to function keys! So looking at my actions in button mode, this is what you would see:
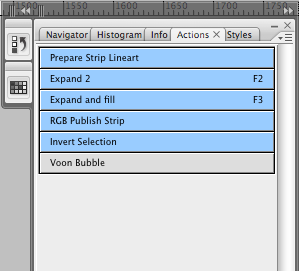
So I scan my artwork (when not working digitally), stitch it together and make sure it’s level, and I hit the first button “Prepare Strip Lineart.” Then I sit back as 26 steps go flashing by at light speed, and in moments I have a document with a lineart layer and a background all ready to color.
Now I begin by flatting, and I select a bunch of areas that take a certain color – say skin color for my main character, Captain John. As you can see in the screen shot above, I have “Expand and fill” set to F3. So after making my selections, I hit F3 and boom (insert John Madden voice there) all the skin is filled and the areas are deselected. I do the clothes, F3, the robots, F3, the walls, F3, etc. You get the picture. I’m now blazing through this process when it took hundreds of keystrokes and mouse clicks without using an action.
When I’m doing my speech bubbles, I select a bubble for Voon, hit the “Voon Bubble” button and boom – it’s done. I never even open the filter settings. And when the strip is complete, I paste a merged copy of the final art in a new document and hit “RGB Publish Strip” and my strip is converted to RGB (I color in CMYK to make sure my colors are not out of gamut for print) and sized appropriately for the web. I export, and I’m done!
Many of you can probably benefit from a couple of my actions, but I’m nearly 100% certain that each of you has your own little processes that take up time that can be stored in an action. Once you figure out a process that you want stored in an action, it’s a simple matter to create one.
The first thing you want to be sure of is that you have your process memorized or written down, and that you have a document open on which to execute that process. When you record your Action, you want to do it exactly as you would normally without any mistakes – because if you make mistakes, those get recorded, too! (And if you do, you can just start over.)
Next, you need to be in “list” mode, so if you chose “Button Mode” before, go back and change it back by clicking that little “list” icon in the upper right hand corner of the panel and deselecting “Button Mode.” At the bottom of the panel you’ll see some familiar buttons. The garbage can is self-explanatory. The “new” icon – the page with a flap – gives you a new action, like so:
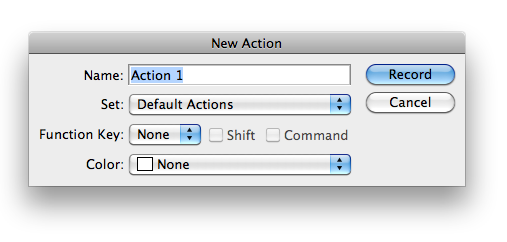
Here you’ll want to give your action a name, as well as assign it a function key if you desire. (If it’s something you do a lot, like my fill action, it really helps to do this.) Note you can give the function key modifiers like shift or command, too. You can also give actions colors if you like to categorize them.
At this point you want to be ready, because once you hit the “Record” button, you are live. So it’s important to have any “pre-existing” steps already done before recording your action. For example, for my fill area action, it presupposes a selection. So I recorded my action with a selection already made. If I were to try and run my fill area action without a selection, I’d get an error (or some funky results, depending on the action).
You’ll see the circle icon at the bottom of the panel turn red, indicating you are recording. You now perform all the steps of your process, and when you are done, you hit the square icon (see below) to complete the recording.
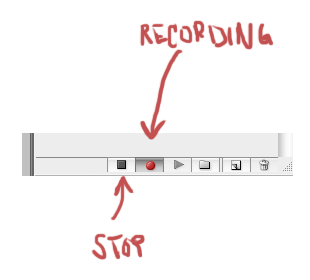
Now your action is complete! Switch back to button mode and give it a try. Then sit back and bask in the glory of all the time you will save.
Here’s a short little video showing me using my fill action on a couple of characters:
If you’d like to use or mess around with my own actions, you can download them from my resources page (click the big actions icon.) You load them by clicking that same “list” icon and choosing “Load Actions.” They will be appended to anything else that is there. Note, if you want to try and use the “Prepare Strip” action, you need to set your foreground/background color to default (black in front/white in back) and you need to click the background layer in your grayscale scan and give it the default name of “Layer 0.”
As always, have fun making comics!
__________________________
See Tom’s webcomic called Marooned here: www.maroonedcomic.com
makingcomics.com
Good write up on explaining Photoshop Actions! By the way, I hand-pick the best free Photoshop Actions from all over the web, from all different developers, and sort them into categories on my website!
Have a browse through our collection of: Free Photoshop Actions
Cheers and happy Photoshopping!!