Inking may be one of the most misunderstood disciplines of the comic art world. All it involves is tracing over lines that have already been drawn, right? Well, there’s a bit more to it than that; the craft is actually quite complicated with its variety of tools and methods to complete the given task.

Instead of talking about the ways to ink a piece (those are usually best taught through video anyway), I’m going to run through some of the more commonly used tools of the craft. These certainly aren’t the only ways to ink a page traditionally but they are some of the most commonly used tools you’ll find on your average Marvel/DC inker’s desk (assuming, of course, that they don’t ink digitally in the first place).
Before you start inking anything, you need a surface on which to place said inks. In most cases, that means paper. By and large, the comic industry has relied on Bristol board as its paper of choice, with Strathmore and Canson being two of the most common brands you’ll find in an art store. One thing to note is that in most cases, Vellum-finish bristol board is not your best available option, as it will bleed badly under some inks and tools. Be sure to experiment with your particular set of tools and paper (in the store, if possible) to make sure they are compatible. If you’re inking, a smooth bristol will probably yield better results. I have found that the general rule is “the smoother, the better”. Another choice if you’re using a brush is watercolor paper; watercolor is very thick but the most common varieties are very rough and unsuitable for inking with several of the tools mentioned later in this article, such as Hunt quill nibs and Rapidograph pens. The surface causes those tools to jump around on the paper, leaving a jagged line in their wake; if you use watercolor paper, look for “hot press” papers – they’re much smoother. Other options include illustration paper and, in some cases, even simple drawing paper can be used for inking. One thing to keep in mind is that thin paper (such as regular drawing paper) will often bleed and in extreme cases tear under large amounts of ink.
Next, if you’re planning to use a brush, quill or refillable pen, you’ll need to make a choice about your preference of ink. Most of the time, artists rely on an India black ink but today, there are several acrylic black inks that work as well as the traditional India blacks. They range in price from pennies per ounce to two or three dollars per ounce based on brand name and quality. Most of the time, I stick to the mid-range inks such as Speedball’s lines of Super Black India and acrylic ink. I’ve had good experience with the ink as it provides a nice, rich black that doesn’t brown under drying or thinning (useful in the case of ink washes) and don’t run as easily as some other brands. Other high-end options popular among the inking crowd are Winsor & Newton Black Indian and Dr. PH Martin’s Bombay Indian. Your mileage may vary here but one brand I would avoid is Higgins. Not only does their ink tend to dry brown but it’s also rather watery and doesn’t naturally lay down thick, solid blacks. Unfortunately, Higgins also makes the most common brand of ink you’ll find in an art store. There are a multitude of choices available here and experimentation is your friend (and don’t be afraid to mix inks to achieve the desired thickness/black, my favorite combination is a 50/50 split of Speedball Black India and Speedball Acrylic). If you live in a rural area where options are limited, buy online. It’s worth a few extra dollars and a few days shipping time to make sure your ink doesn’t let you down five hours into a twenty hour project.
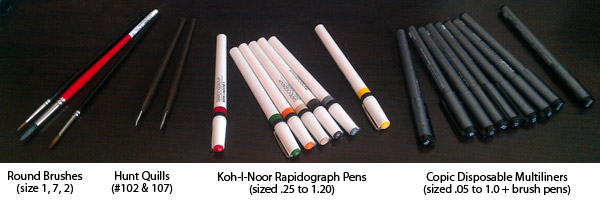
Now on to the interesting part: the tools! I mainly use a mix of brush, quill, and refillable Rapidograph pen to ink my webcomic, Variables. I also draw a fair amount of sketches and drawings that I color traditionally and for those, I rely on a set of Copic Multiliner disposable markers. Along with all of that, I also have a wide collection of Sharpies and other marker brands to do large pieces and fill in black areas.
Before I delve into the variety of disposable options available to you, I’ll run through the tools that require an old fashioned ink well or require periodic refilling. These break into two main categories: brushes and quills. Brushes come in a staggering variety of shapes, sizes, and materials. I’ve had great results with the cheapest set of $3 set of brushes you can find. Now that I’m a bit more experienced, I stick to the Winsor & Newton Series 7 line of brushes but given the price of these brushes (they start around $15 apiece and quickly go as high as $50 for a larger brush), they’re not really a good starting point for someone learning the ropes of inking. Some good alternatives are the Winsor & Newton University brushes (instead of sable hair, they use a synthetic fiber), as they work with a plethora of media and won’t break the bank. For most inking work, a pointed round brush is the artist’s standby brush. It allows an inker to vary line width from tiny to thick with a single stroke and unlike wide flat brushes, it will produce a consistent thickness as you twirl the brush for curved lines. I use a 1 or 2 size (with an occasional size 7 for huge black outlines) but my inking style is rather detailed; a larger size may work best for you based on your style of drawing.
Quills are a bit simpler; the vast majority of the industry relies on one quill nib: the Hunt #102. Hunt also makes other quills such as the #100 and #107 (they actually make quills from #99-#108 but most are very rare and hard to find) but the #102 is the king of the hill. It provides a nice mix of fine detail to thick lines that approach ⅛” and while its learning curve is closer to black diamond than green circle, the versatility of the tool is unmatched outside of using a brush. I also have a few #107 quills on standby for when I need to work on really fine, detailed linework. It offers a marginally thinner line but lacks the #102’s ability to widen up to a much thicker line.

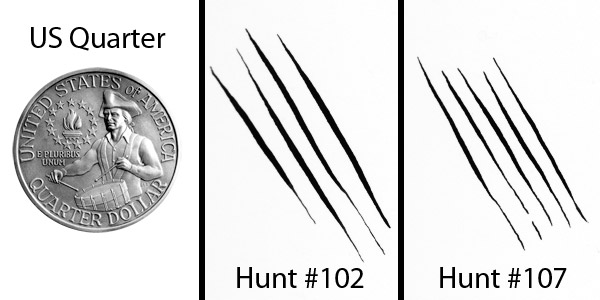
A Hunt #102 and #107 with US quarter for size comparison. Both quills were pushed to near-breaking point for maximum line width.
For work that doesn’t require varied line width, I have a set of Koh-I-Noor Rapidograph pens. These are refillable, have replaceable cartridge nibs, use the same ink as my brush and quill, and work great for buildings, panel borders, text, and vehicles. Basically, they’re good for any non-organic item that doesn’t need line variance. Since non-organic objects are often better portrayed through the use of a mono-thickness line (it helps differentiate them from the flowing, full-of-life organic characters in your comic), these Rapidographs complement my other tools quite well. Buyer beware, though. Rapidographs start at around $15 apiece and in the case of Koh-I-Noors, are notoriously fickle, constantly clogging and breaking, as the filaments in the tip can be very fragile. An alternative to the typical technical nib for these pens is a “jewel tip,” made of a much stronger material that lasts longer, but they can cost as much as three times what the standard steel nibs cost. Though they’re good tools when used properly, after a few weeks with a set, you’ll be convinced their main purpose is to see how quickly they can drive their owner to insanity. I’ve heard that Rotring makes a more durable and user-friendly pen but they’re even more expensive per pen and I have no first-hand knowledge of the product; unfortunately, Rotring technical pens of this kind are no longer available in the United States except by special order.
Next up are the disposable options available for inking. Here, there are dozens of brands, styles, and uses of markers. Some I’ve tried (and I’ll talk about them) but since the rise in popularity of “manga” in the west, it seems as if every pen manufacturer makes a cheap line of “manga style” inking markers, whatever that means. Aside from the myriad of throwaway brands that litter the market, the biggest contenders for the professional dollar seem to boil down to Copic, Micron, and Prismacolor. I’ve used all three brands and will tell you right off to avoid the Prismacolor Premier line at all costs. The brush pen is decent with a relatively solid black and good flow but it requires Herculean strength to get the fixed-line pens to draw a consistent line and the pens do not feather at all. Stay away. Microns are extremely popular and offer much better line feathering with a pretty rich black; they’re definitely a good choice for the type of lines needed in comic book creation. You won’t be disappointed with the pens. Recently, I purchased a set of nine Copic Multiliners for use at conventions and after a few hours with the pens, I’m a Copic devotee for life. They’re the best disposable pens I’ve ever used and it’s not even close. Beautifully feathered lines with virtually no effort, solid black ink good for reproduction, and a wealth of sizes to do whatever you need done. I can’t recommend them highly enough, especially when you consider that they’re priced competitively with any of the other brands I listed. A true win-win tool of the trade and considering the price of art supplies, a rare commodity.
Before I close out the disposable pens, I’d like to make a mention of the ubiquitous Sharpie. We all love Sharpies. I use them constantly to fill in blacks, sketch out very rough concepts, take notes, blah blah blah. I have a drawer in my drafting table with over 50 Sharpies of various sizes in it. But I don’t use them to draw. They bleed. They don’t offer good line variation. The tip will suddenly turn bad, leave indentations on the paper, and make a horrible screeching noise to boot. I’ve seen people draw with them and draw quite well. It is possible to do it. But with the plethora of superior tools on the market, leave the Sharpies behind for secondary work. They’re just not worth the hassle.

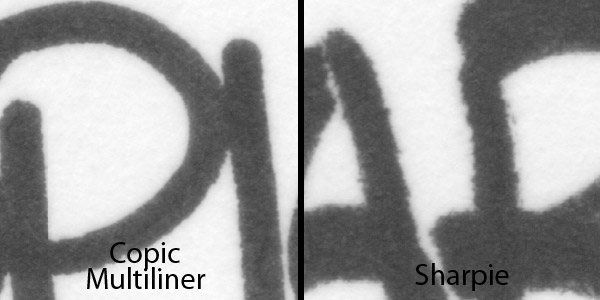
An extreme magnification shows how a Sharpie bleeds into bristol board while a dedicated art pen like the Copic glides the ink over the top of it. You may not think it makes much of a difference visually but you’ll be disappointed when your book goes to print and your lines aren’t as crisp as they could be.
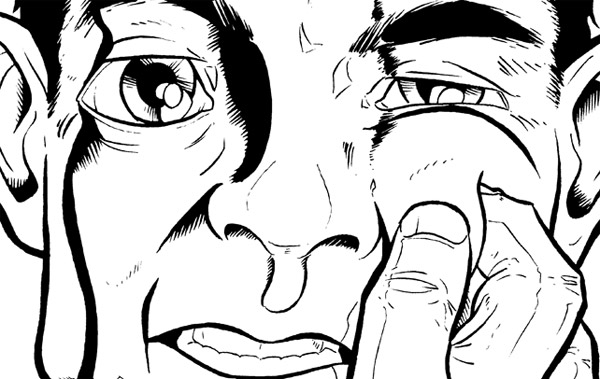
To show a finished product, here is a recent panel I finished for my comic. It’s a closeup of a man’s face and was mainly completed using a round #2 Winsor & Newton Series 7 brush and a Hunt #102 crow quill. You see the large, sweeping marks that form the man’s jaw and the thick black shadow along his right (your left) cheekbone? Those are brush marks. Big, sweeping gestures are a brushes’ forte. Working from the elbow and laying down a lot of ink at once. That’s when I primarily rely on a brush to ink a page (but certainly, that is not the only time you can use it). On the other hand, the small detail lines are almost all created by the Hunt #102 quill. I work with a quill more than most artists but that’s just my preference. Just so you know, this panel is only 4”x5” on the bristol board. The quill allows for a lot of fine detail (as do the smaller Rapidographs).
Those are the tools I use to work on pretty much anything I need to do if it in any way involves ink. There are other tools out there and I highly recommend trying as many things as possible to find out what fits your style. By no means is my way the only way to ink a page. Hell, some people use razor blades (!) to ink certain elements of a page and their stuff is fantastic. But if you start off with a few of the tools I’ve talked about in this article, you’ll be well on your way to understanding the base set of “professional” tools used within the industry and after experimenting with them for awhile, you’ll probably walk away a better artist. I know I did.
Brock Beauchamp is the artist/writer/creator/organ grinder’s monkey for the webcomic Variables by SelfCentEnt.
makingcomics.com


Question – when Mr. Beauchamp is talking about disposable pens, he uses the term “feathering.” What quality is he describing here? I can’t quite imagine what he is referring to.
Feather usually means when the line frays at the end. I will look more into this.
Patrick is right, Michael. Feathering is when a line goes from thick to thin. When you feather a bunch of lines in a row it creates a gradient from light to dark. It’s more common to use a brush or nib to feather, but it is doable with pens as well (but is more difficult, imo).
Is it necessary to use waterproof ink for inking?
Hey guys. I was reading this page and found quite helpful, but I’d like to ask so questions about inking. First off, I pretty new to inking; if you were to look at my artwork on DA you’d see my skills are pretty poor. I plan to change that but I’d like some advice on certain methods I plan to undertake.
First thing I wanted to ask are about brushes. I’ve looked around for all over the web for ideas to experiement with, and came across an idea that caught my eye. In one video someone posted on youtube, an artist was using one of those Chinese Bamboo Brushes for their inking. I found it odd for them to use that particular brush because I always thought that any medium other Chinese Ink and Watercolor would ruin the brush. Am I wrong about that? If I’m wrong, could it be a good kind of brush to use for inking?
Lastly, is Bristol Board the mandatory surface in regards to inking? My reason for asking is because I came across a deal on a pack of Cardstock Paper which had five more times the number of sheets, and costs the about same, of the Bristol Board I tend to use for inking. Another reason I’m asking this is because the store I usually buy my Bristol Board switched from smooth to vellum. What are your opinions on that?
A Chinese Bamboo Brush could work well for inking if you find one that has firm bristles and a fine tip that holds together. The one I have has very soft bristles and is huge so I only use if for filling in large areas of black. A lot of artists swear by sable hair brushes such as a Raphael 8404, Winsor Newton series 7, or Scharff fine #2 (which is what I use a lot). I also like the refillable Pentel pocket brush pens with synthetic tip (once the refills run out it becomes a regular dipping brush).
As for cardstock…I’d avoid it. It’s going to bleed a lot. You might not notice it if you’ve never used bristol board before, but the difference is huge. Bristol board is made to hold up much much better than ordinary cardstock. And every so often you even get a bad pad of bristol board that bleeds, too. This kept happening to me with Strathmore boards so I switched over to Canson Fanboy art boards and have had no complaints ever since.
A lot of inking is trial and error. Testing out different products is a lot of fun and you’ll *eventually* end up using anything and everything you buy, so nothing is a waste. It can be a little costly sometimes, but it’s important that you find the tools that work best for you. There’s nothing more exciting than finally discovering the “right brush.”
Buying tip – When buying a new brush at your local art store, ask for a cup of water to test the brush in. Dip the pen in water and roll the tip across a piece of paper to make it as sharp as you can. Then flick the shaft of the brush against the side of your hand several times to ensure that the bristles stay together. If they start to separate after just a few flicks find a different brush, as this one won’t hold up well when you’re inking.
Waterproof ink is not essential. But if you’re the type of person who uses a fair amount or white out/correction fluid (such as myself) you’ll want to look into waterproof inks. Koh-I-Noor waterproof ink is fantastic. Higgins is ok, too.
What kind of ink do you use to fill your rapidographs? I can’t find a nice easy flowing ink for my .25mm and smaller.
Also, I can’t use sharpees because their ink comes out a different shade of black than the microns and copic multiliners, do you have any suggestions for some really really thick wide square edged markers that come out as black as the multiliners?
hi there,
Thanks for these helpful tips. Can you offer any guidance on the role that the angle of yr work surface offers when working with crow-quill pen & ink drawing?
Hmm. Good question. I’m not actually sure about this, but if I come across an answer I’ll let you know.
I guess I’m an oddball. I recently decided I Prefer the strathmore vellum! I use a brush to ink with and I like the drybrush effect I can get (when needed) i also like the bit of “drag” on my brush. When I need a straight , mechanical line, I use a micron. I’ve found a lettering nib and a bowl nib can work on vellum. The quills, not so much.
Great article and techniques. Thanks for the share. I have a set of Rapidograph pens, the only downside is that you can’t get the flick like other inking pens or brush pens. Does anyone have a system to keep their inking tools organized? I hold my pens like wolverine, between my fingers, but can only hold so many pens.
This is a very important pen issue. Pen lover loves the post. I appreciate this post. Thank you for sharing this post.